We realized a lot of our GROW.bio friends don’t have laser cutters, CNC machines, or thermoformers to make growth forms on their own. So! We are launching a guide that will be continuously updated to help you make your own forms using items found at home!
Form Making Tips & Tricks
- Always sterilize your growth forms.
- Use non-porous materials or use a non-porous liner on the inside of the growth form.
- Make sure the growth forms are sealed tight to prevent moisture from escaping.
- Poke air holes to provide oxygen.
- Think about how you will remove your piece from the growth form. If you are making a growth form with design features on all sides, your growth form should separate into 2 or more parts.
- If possible, angle the growth form’s sides, a very minimal 2 degrees, to allow parts to slide out easily.
- Think about how many times you want to use the growth form. Some materials can be washed and reused multiple times. The more you plan to reuse it, the sturdier the material should be.
- Condensation building up inside your growth form is a sign of healthy mycelium growth!
Suggested Growth Forms Making Techniques
Found Items
Found items are the easiest method to assemble a growth form.
- Look around your house, go to a garage sale, go dumpster diving, find a kitchen supply store, or even take from your tupperware shelf at home.
- The best found objects are non porous and allow you to poke air holes in them.
In the past our customers have used things like bowls, cups, lampshades, and takeout containers. Check out some examples below:
 |
 |
 |

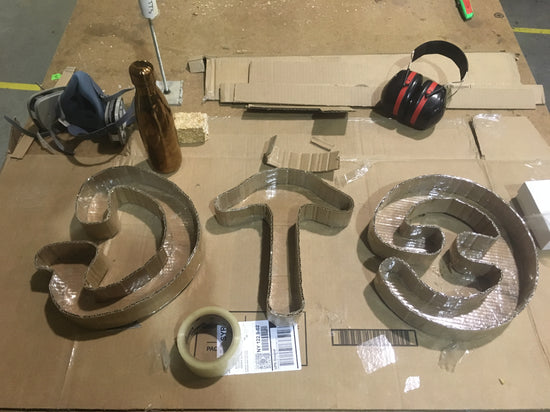
Cardboard Growth Forms
Cardboard growth forms allows you to make complex shapes with just a craft knife and tape.
- Construct your shape by cutting and folding the cardboard.

- Use tape as necessary. Line the inside of your cardboard with plastic wrap, tape, wax, or any other waterproof liner. Bonus points if you have access to waxed cardboard (commonly found in take out boxes).

- Corrugated cardboard sealed with tape is great for geometric shapes with straight edges like cubes, triangles, etc.
- When constructing organic forms use corrugated cardboard. Round or organic shaped growth forms can cause bumps on your final grown piece from recesses in bent corrugated cardboard.


Bag Growth Forms
Grow organic shapes with a garbage bag or plastic film.
- Draw your pattern onto the bag.

- Account for the extra space the pattern will require when it is 3 dimensional.
- Cut the pattern out and tape the seams together/use an impulse sealer.
- Add your mycelium material.


- Make sure you seal the bag to prevent too much moisture from escaping.
-

We missed sealing in one area and the mycelium dried out and didn’t grow
- Poke holes for airflow.

- If your bag growth form cannot support itself standing up, think about hanging it. If needed you can add structure to the bag like taped on cardboard or thick wire or to the mycelium with wooden armatures on the interior.


Growth Form Techniques in Progress
Tape Growth Form
Tape growth forming is a great way to create growth forms that take the shape of an existing object.
- Wrap your object with the sticky side facing up, not touching the mycelium material.
- Wrap with a second layer of tape (sticky side to sticky side).
- Stretchy tapes like duct tape will limit the amount of wrinkles that form on the inside of your growth form with organic shapes.

Taking tape handle form of Japanese knife


Growing a tape form handle onto a new knife
Wood Growth Form
Wood growth forms are a sturdy option for making reusable forms.
Waterproof the interior to keep the mycelium from growing into the wood.
If you don’t waterproof the interior, you can grow mycelium directly into the unfinished wood. Make sure to sterilize the wood first by soaking it overnight in 3% hydrogen peroxide.
Advanced Growth Form Making
A lot of people don’t have access to these tools at home. Try finding a local makerspace or machine shop near you!
Thermoformed Growth Forms
You can create growth forms that are used to produce many grown parts using a thermoformer or vacuum former. CNC your positive shape out of a non heat sensitive material, like wood. Thermoform a sheet of plastic around the positive form. Take the growth formed plastic sheet off the CNC shape. Fill the plastic sheet with mycelium material.
3D Printed Growth Forms
3D Printing can help create precise multi part growth forms with complex shapes. Keep in mind, some 3D Printed plastics like PLA have the potential to be eaten into by the mycelium. You should seal those growth forms.
Get creative! Forms Forms Forms!!!
The possibilities are endless. Our fellow GROW.bio member Ben Coney is using sand covered with plaster gauze to create the growth forms for his mycelium project. If you come up with a unique way to make forms, leave a comment below and we’ll add it to this guide!